"Almost Argyle"
Here is my entry for the June Great Cakes Soap Challenge: Sculpted Layers. If you will be so kind as to forgive the lengthiness of this post, I'll be most grateful! Feel free to skip through.

I watched Claudia's and Amy's tutorials several times before deciding on a pattern I liked. I'm not much for landscapes, although once I learn this technique, I'd really like to do a mountain scene, one that looks like the miles of misty ridges that you can see from scenic overlooks on the Blue Ridge Parkway. For this month's challenge, however, I was more drawn to patterns and symmetry. I love gradients, and thought I'd like to see if I could incorporate gradient shading into a repeatable, symmetrical pattern.
Here's a sketch of what I wanted to try:

It seemed plenty challenging, especially since I wanted the gradients to be very precisely colored. Three of the four colors (shades of the same color) would each need to be divided in half so that they could be poured twice: dark on the bottom, proceeding to light in the middle, and then back to dark on the top. But before halving, each color would need to have some drawn off to serve as the base for the next lighter shade, made by mixing uncolored batter into it. Some of that resulting batter would again need to be drawn off to go in the next lighter shade, and so on. Each layer needed to be thickened with either clay, sodium lactate, an accelerating fragrance, or some combination of the three just before pouring it.
Some pretty tricky math needed to be applied! Claudia's spreadsheet might have helped if I had been using distinctly different colors, rather than gradients. But I do love a puzzle, especially when math is involved, so I worked up a process, and typed it out step-by step so I'd have it to go by as I worked.
The next thing to consider was recipe. It's so great in Amy's challenges to be given a recipe as a starting point! I'm a great believer in following the experts' suggestions, but I felt I had to make some adjustments to Claudia's recipe. First of all, I'm trying to reduce the percentage of coconut oil in all of my recipes because I just don't like how dry my skin feels when washing with soap that has over 20% CO in it. So I reduced the CO content to 16%, reduced the castor oil to 10%, and made up the difference by using beef tallow. Gotta get that tallow in there somehow, as my friend and I just rendered the fat from a cow and ended up with over 90 lbs of tallow! Also, I don't have a Costco membership and couldn't find any info on the "Mediterranean Blend" Claudia mentions, so I simply guessed that olive oil would do as a replacement. And finally, as regards Claudia's recipe, I was a little worried about having to fiddle around with both sodium lactate and kaolin clay while working with the gradient. So I opted to leave out the sodium lactate, and hoped that the addition of the beef tallow would help with hardening. (It didn't occur to me until later that I could have simply calculated the total amount of SL and mixed the kaolin clay into it, adding the mixture to each layer as I went. Duh!)
Finally, I ran everything through Soapcalc and came up with this:

In my first attempt, my colors were shades of brown and somewhat manly, so I chose to scent the soap with Indian Sandalwood, a fragrance oil from American Soap Supplies that reviews said did not affect trace, but discolors to a light beige. I could live with that, given the colors I was going for anyway. For colorants, I decided to use cocoa powder, a tip Amy gave me during last month's challenge, plus a little activated charcoal for the very darkest brown on the bottom and the top.
Now it was time to make my cutouts, and I used a thick vinyl place mat I found at Walmart with popsicle sticks to make the tops stiffer. I found that cheap plastic cutting boards were just too floppy, but the Walmart placemat was just the right amount of thickness to be stiff, yet easy enough to cut with scissors. I even made a little scraper, since I didn't have one small enough to get inside the mold and scrape the sides as I went.

On soaping day, all seemed in readiness, but truth be told I was nervous about all the unknowns. I may be comfortable with math, but it can let you down if you start with the wrong premise. Also, I really had no idea how my recipe would behave. Would I have enough time to work with the gradient process? How much time would each layer need to set up enough to sculpt after being poured? Would the remaining colored batter portions wait patiently for their turn to be poured?
Well, as it turned out, I did have a wrong mathematical premise to deal with: I hadn't
allowed for enough overall batter to divide up into the separate layers, leaving precious little wiggle room while sculpting each one. There was even just barely enough to fill the mold all the way to the top. Part of this had to do with me being a cheapskate and not wanting to waste batter. But it also had to do with last minute resizing for my mold, and taking into account the relatively low water in the recipe. Still, on each layer, I squeaked by with just enough to run the scraper across, but hardly any more. Sometimes precise math can come in handy, and sometimes it's just downright scary!
allowed for enough overall batter to divide up into the separate layers, leaving precious little wiggle room while sculpting each one. There was even just barely enough to fill the mold all the way to the top. Part of this had to do with me being a cheapskate and not wanting to waste batter. But it also had to do with last minute resizing for my mold, and taking into account the relatively low water in the recipe. Still, on each layer, I squeaked by with just enough to run the scraper across, but hardly any more. Sometimes precise math can come in handy, and sometimes it's just downright scary!
I wanted to scrape a perfectly flat top with the last color, but had to add some of the scraped off colors to be able to fill it up to the top of the mold. So I formed streaks of color as I ran a flat spatula across it. All told, my leftover batter amounted to less than a third cup! I like to gel my soaps, so this one got wrapped in towels and went into a warm oven turned off.
Here's my first attempt, and I was pretty pleased with it, especially considering the learning it provided:
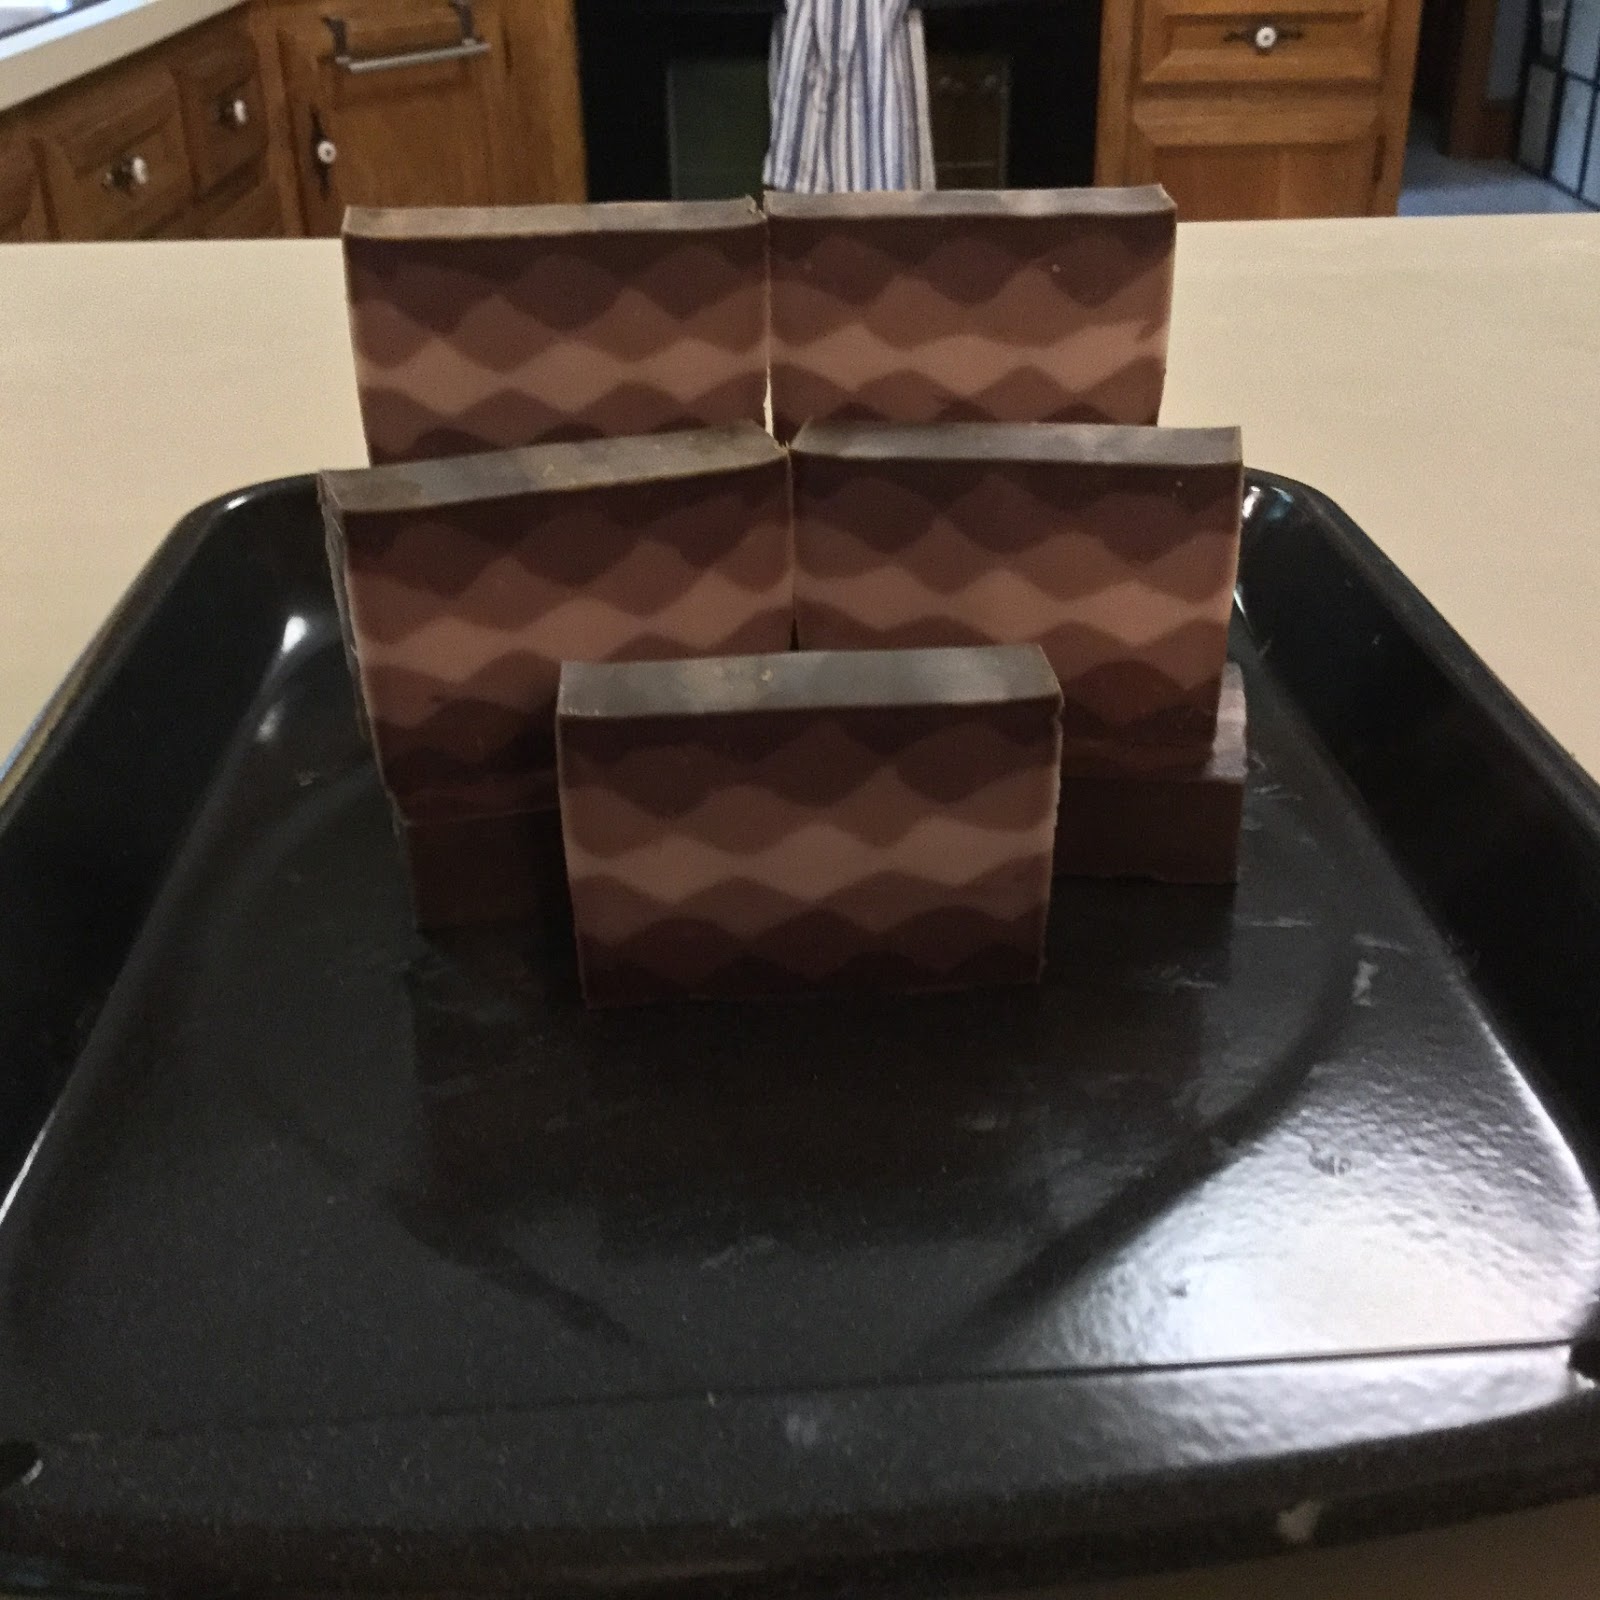
With these results, it was clear to me that only my impatience was keeping me from getting sharp lines on each layer, and that if I had only waited a little longer for the soap to set up before shaping, I would have achieved what I was looking for. Now that I knew how the batter would behave I was eager to try again, feeling sure I could get those zigzags into sharper points.
For my second attempt, I felt ready to kick it up a notch and add a gold mica line to define each layered color, and to change the color scheme to blue. I wanted the mica line to give the finished soap an almost argyle look, which is what the brown soap made me think of when I first saw it. I played around with the mica samples I had, and came up with another simple sketch:

Instead of strict adherence to gradient shading using only one mica color and diluting it, I made it easier on myself by choosing two different micas from Nurture Soap: "Blue Vibrance" and "Nautical Blue." Black Pearl mica was added to Blue Vibrance to get the darkest navy blue, and titanium dioxide was added to the Nautical Blue to get the lightest. I also decided that I'd use sodium lactate along with the clay. I debated using an accelerating fragrance oil instead, it was one that I really love that would go with the blue shades: Salty Mariner from Brambleberry. But in the end I thought it best to save that one for another day. It accelerates like a runaway freight train, sometimes rices, and I didn't think I needed the aggro. The sculpting requires enough nerves of steel and patience as it is. So I used a blend of lavender and tea tree essential oils plus a little amber fragrance oil. This blend has been a favorite of mine and I didn't expect it to throw any surprises.
Surprisingly enough, my fragrance choice did throw a curve ball, I think. It seemed to slow trace when I added it along with the sodium lactate and clay just before pouring each layer. Some of them took 10 minutes or more to set up. Fortunately, the recipe allows for plenty of time to wait. Even with 7 distinct layers, I was able to work good sharp peaks with my cutout scrapers, and only the very last layer had become thick enough to not require the addition of clay and sodium lactate. I spritzed each layer with a fine mist of almond oil mixed with water before sifting the gold mica on. Note to self: figure out a a way to "poof" the mica on better, or practice first. This mica wanted to clump, even coming out of the fine sieve I was shaking it from.


I want to thank Claudia for working out this technique, and most especially for her recipe and incredible tutorial. The calculator is the bomb! Although I didn't use it for my attempts, it is a fabulous tool to have for other sculpting projects I have in mind. And I know it was a labor of love for her to design and publish: precious time freely given so other soapers could benefit! Thank you, thank you, Claudia!
And thank you, Amy, for hosting the monthly challenges, introducing such fun and goodwill to soapers worldwide!


